Cloudflare的andwidth Alliance(带宽联盟):将B2接入CloudFlare CDN进行缓存,B2不收取下行流量费用
在B2中创建Buckets为Public属性,然后上传一张图片,得到形如 https://f001.backblazeb2.com/file/bucketsname/abc.png这样的地址。
启用CloudFlare CDN
域名需要使用cloudflare平台解析,将想要的自定义的域名(或子域)cname到 f001.backblazeb2.com
CloudFlare - Page Rules - Create Page Rule,创建一个页面规则。
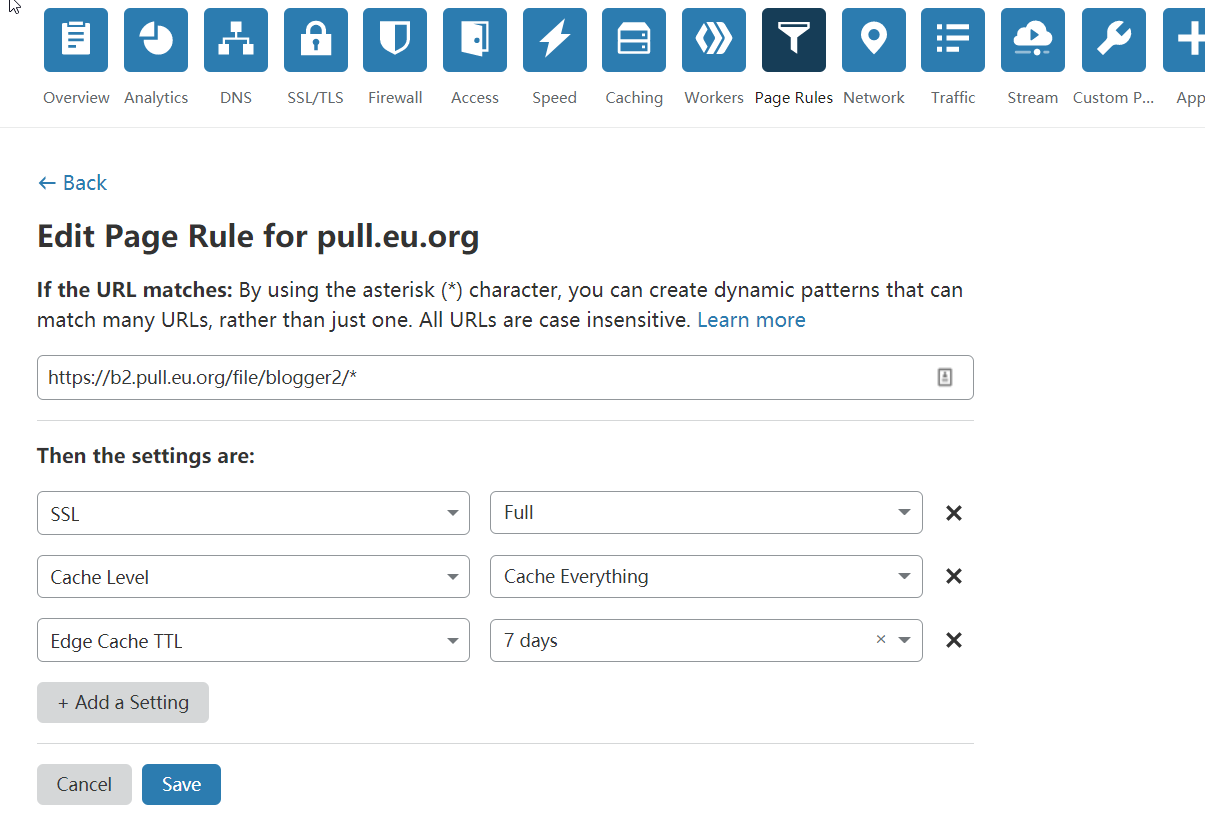
重写规则为您的域名 + /file/ + b2 bucket name + /*,接入CloudFlare的更多说明可以参考官方博客:Using Backblaze B2 with the Cloudflare CDN
如果你的文件不会经常改变,强烈建议你添加一条 page-rule(页面规则) 来设置 “cache level(缓存等级)” 为 “everything(所有)”, 并且 “edge cache TTL(边界缓存存活时间)” 设置为较高的值,比如 7天。
设置Backblaze B2
虽然启用了CloudFlare CDN,但发现缓存永远不能命中(MISS),我们需要对添加一个缓存指令(默认是不缓存),打开存储桶设置,桶信息(Bucket Info): 设置为 {"cache-control":"max-age=43200"}
其中43200单位为秒(s),意思就是说43200秒内CF不会去从源站重新获取资源。
通过浏览器F12调试工具已经可以看到请求命中了CF缓存,HIT。
至此,我们就可以使用 https://自定义域名/file/bucketsname/abc.xyz 这样的图片链接了。理论上使用B2 10的免费存储,又使用cf的带宽联盟进行流量免费使用。
其中43200单位为秒(s),意思就是说43200秒内CF不会去从源站重新获取资源。
通过浏览器F12调试工具已经可以看到请求命中了CF缓存,HIT。
使用workers优化url
该种方式的优点有:
- 去除 URL 中的 /file/
部分 去除一些从 Backblaze B2 响应的无用请求头 加上基本的 CORS 请求头,以便允许图片嵌入到网站中 为图片优化缓存 (浏览器的缓存, 以及 CDN 边界服务器上的缓存)
缺点:占用cloudflare workers每天10W次的免费请求额度。
使用前,注意修改 b2Domain 和 b2Bucket 这两个变量的值.
b2Domain,是你图床的二级域名。
b2Bucket,是你的 bucket 存储桶的名字。
进入 workers 功能,点击 Launch Editor ,进入编辑器,将以上代码拷贝到编辑器中,然后保存 worker。 使用了这个 worker 后, 你可以从 URL 中去掉 /file// 部分,
使得生成的 URL 是这样的形式 https://subdomain.domain.com/test.txt,
而不是 https://subdomain.domain.com/file//test.txt.
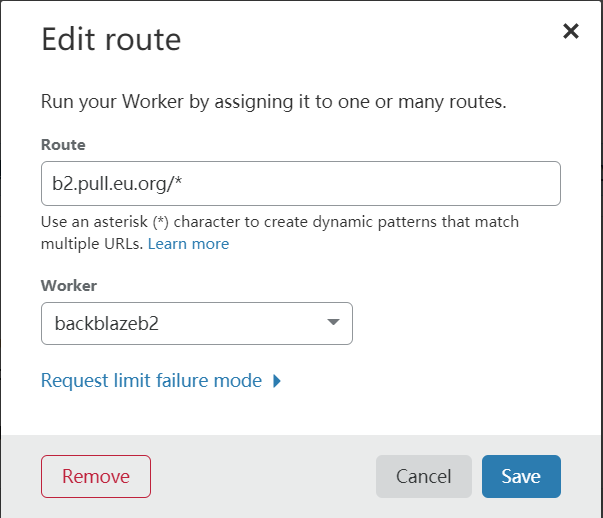
你需要添加一条 worker 的路由规则,使访问 subdomain.domain.com/*时,请求先由 worker 来处理。
至此,上传到b2中的图片文件即可使用https://自定义域名/filename.png的形式了。
我的ShareX设置是:截图后另存为,以便于修改文件名以及编辑图片。然后再使用拖曳窗口上传,完成后自动复制URL地址。
使用前,注意修改 b2Domain 和 b2Bucket 这两个变量的值.
b2Domain,是你图床的二级域名。
b2Bucket,是你的 bucket 存储桶的名字。
; const b2Domain = 'img.domain.com'; // configure this as per instructions above const b2Bucket = 'bucket-name'; // configure this as per instructions above const b2UrlPath = `/file/${b2Bucket}/`; addEventListener('fetch', event => { return event.respondWith(fileReq(event)); }); // define the file extensions we wish to add basic access control headers to const corsFileTypes = ['png', 'jpg', 'gif', 'jpeg', 'webp']; // backblaze returns some additional headers that are useful for debugging, but unnecessary in production. We can remove these to save some size const removeHeaders = [ 'x-bz-content-sha1', 'x-bz-file-id', 'x-bz-file-name', 'x-bz-info-src_last_modified_millis', 'X-Bz-Upload-Timestamp', 'Expires' ]; const expiration = 31536000; // override browser cache for images - 1 year // define a function we can re-use to fix headers const fixHeaders = function(url, status, headers){ let newHdrs = new Headers(headers); // add basic cors headers for images if(corsFileTypes.includes(url.pathname.split('.').pop())){ newHdrs.set('Access-Control-Allow-Origin', '*'); } // override browser cache for files when 200 if(status === 200){ newHdrs.set('Cache-Control', "public, max-age=" + expiration); }else{ // only cache other things for 5 minutes newHdrs.set('Cache-Control', 'public, max-age=300'); } // set ETag for efficient caching where possible const ETag = newHdrs.get('x-bz-content-sha1') || newHdrs.get('x-bz-info-src_last_modified_millis') || newHdrs.get('x-bz-file-id'); if(ETag){ newHdrs.set('ETag', ETag); } // remove unnecessary headers removeHeaders.forEach(header => { newHdrs.delete(header); }); return newHdrs; }; async function fileReq(event){ const cache = caches.default; // Cloudflare edge caching const url = new URL(event.request.url); if(url.host === b2Domain && !url.pathname.startsWith(b2UrlPath)){ url.pathname = b2UrlPath + url.pathname; } let response = await cache.match(url); // try to find match for this request in the edge cache if(response){ // use cache found on Cloudflare edge. Set X-Worker-Cache header for helpful debug let newHdrs = fixHeaders(url, response.status, response.headers); newHdrs.set('X-Worker-Cache', "true"); return new Response(response.body, { status: response.status, statusText: response.statusText, headers: newHdrs }); } // no cache, fetch image, apply Cloudflare lossless compression response = await fetch(url, {cf: {polish: "lossless"}}); let newHdrs = fixHeaders(url, response.status, response.headers); if(response.status === 200){ response = new Response(response.body, { status: response.status, statusText: response.statusText, headers: newHdrs }); }else{ response = new Response('File not found!', { status: 404 }) } event.waitUntil(cache.put(url, response.clone())); return response; }
进入 workers 功能,点击 Launch Editor ,进入编辑器,将以上代码拷贝到编辑器中,然后保存 worker。 使用了这个 worker 后, 你可以从 URL 中去掉 /file/
至此,上传到b2中的图片文件即可使用https://自定义域名/filename.png的形式了。
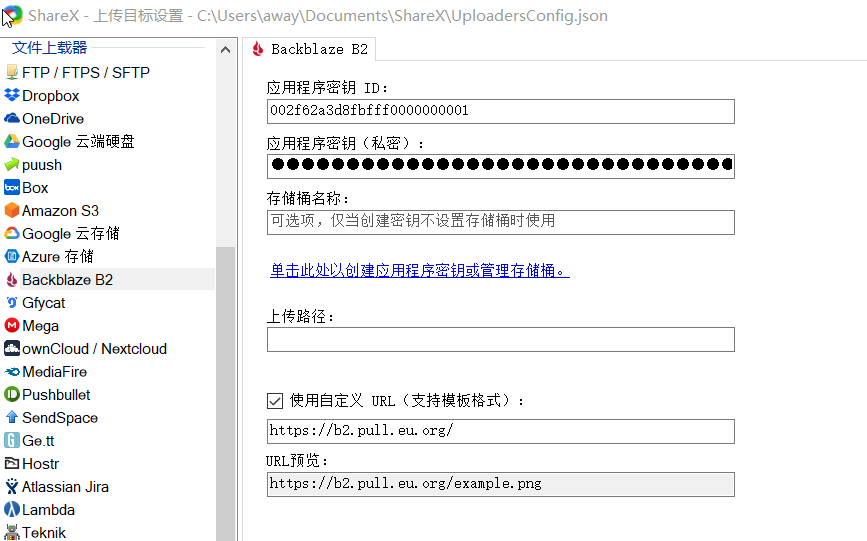
使用ShareX自动上传
在B2中创建Application Keys,密钥记住一次,以后丢失了就没了。然后到ShareX中设定即可。我的ShareX设置是:截图后另存为,以便于修改文件名以及编辑图片。然后再使用拖曳窗口上传,完成后自动复制URL地址。
另一种方式:通过转换规则实现优化URL
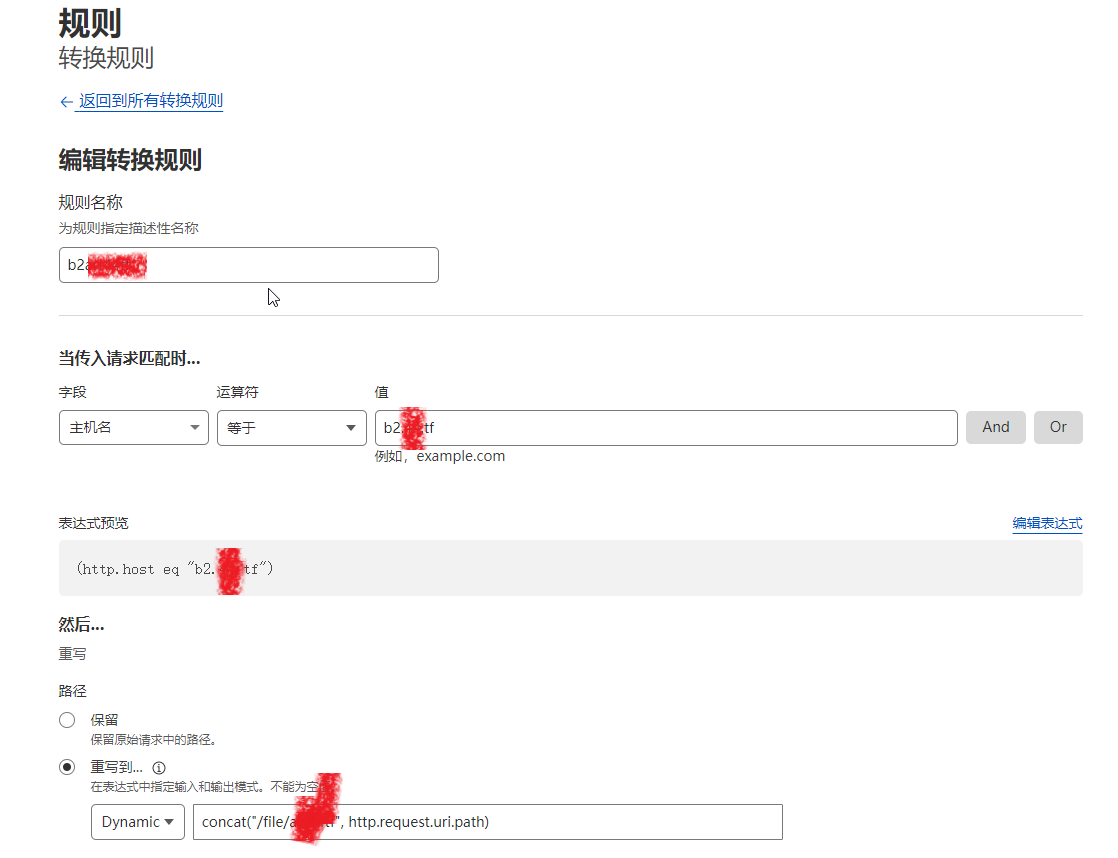
CloudFlare后台 - 规则 - 转换规则 - 创建转换规则 - 重写URL规则名称:随意写
字段:选择“主机名”
运算符:选择“等于”
值:填写您在CloudFlare上对B2的加速域名(你自己的域名)
然后路径选择“重写到 - 选择Dynamic”,并填写:
- concat("/file/bucket", http.request.uri.path)
其中bucket改成你自己的存储桶名称,然后选择部署就行了。
删除不需要的响应头
Backblaze B2会在请求的响应头中添加以下几个header参数:
- x-bz-content-sha1
- X-bz-file-id
- X-bz-file-name
- X-bz-upload-timestamp
虽然没有太大的作用,但从数据上就能看出,你使用的是B2,而且这种东西对我们来说也没什么用,所以我们可以用 CloudFlare修改一下。但我觉得很难有效地修改它,我得花大量的时间去看那些 reference格式,还要仔细分析,看看哪一种比较合适,哪一种比较专业。” 仍然在变换的法则中-建立变换法则-修正应答标题。如果用户所请求的内容刚好在缓存中,那么将内容直接返回给用户。
仍然在变换的法则中-建立变换法则-修改响应头。如果用户所请求的内容刚好在缓存中,那么将内容直接返回给用户。

仍然在变换的法则中-建立变换法则-修改响应头。如果用户所请求的内容刚好在缓存中,那么将内容直接返回给用户。